


简单的放置类游戏自动回血脚本设计思路 For Melvor Idle

背景介绍
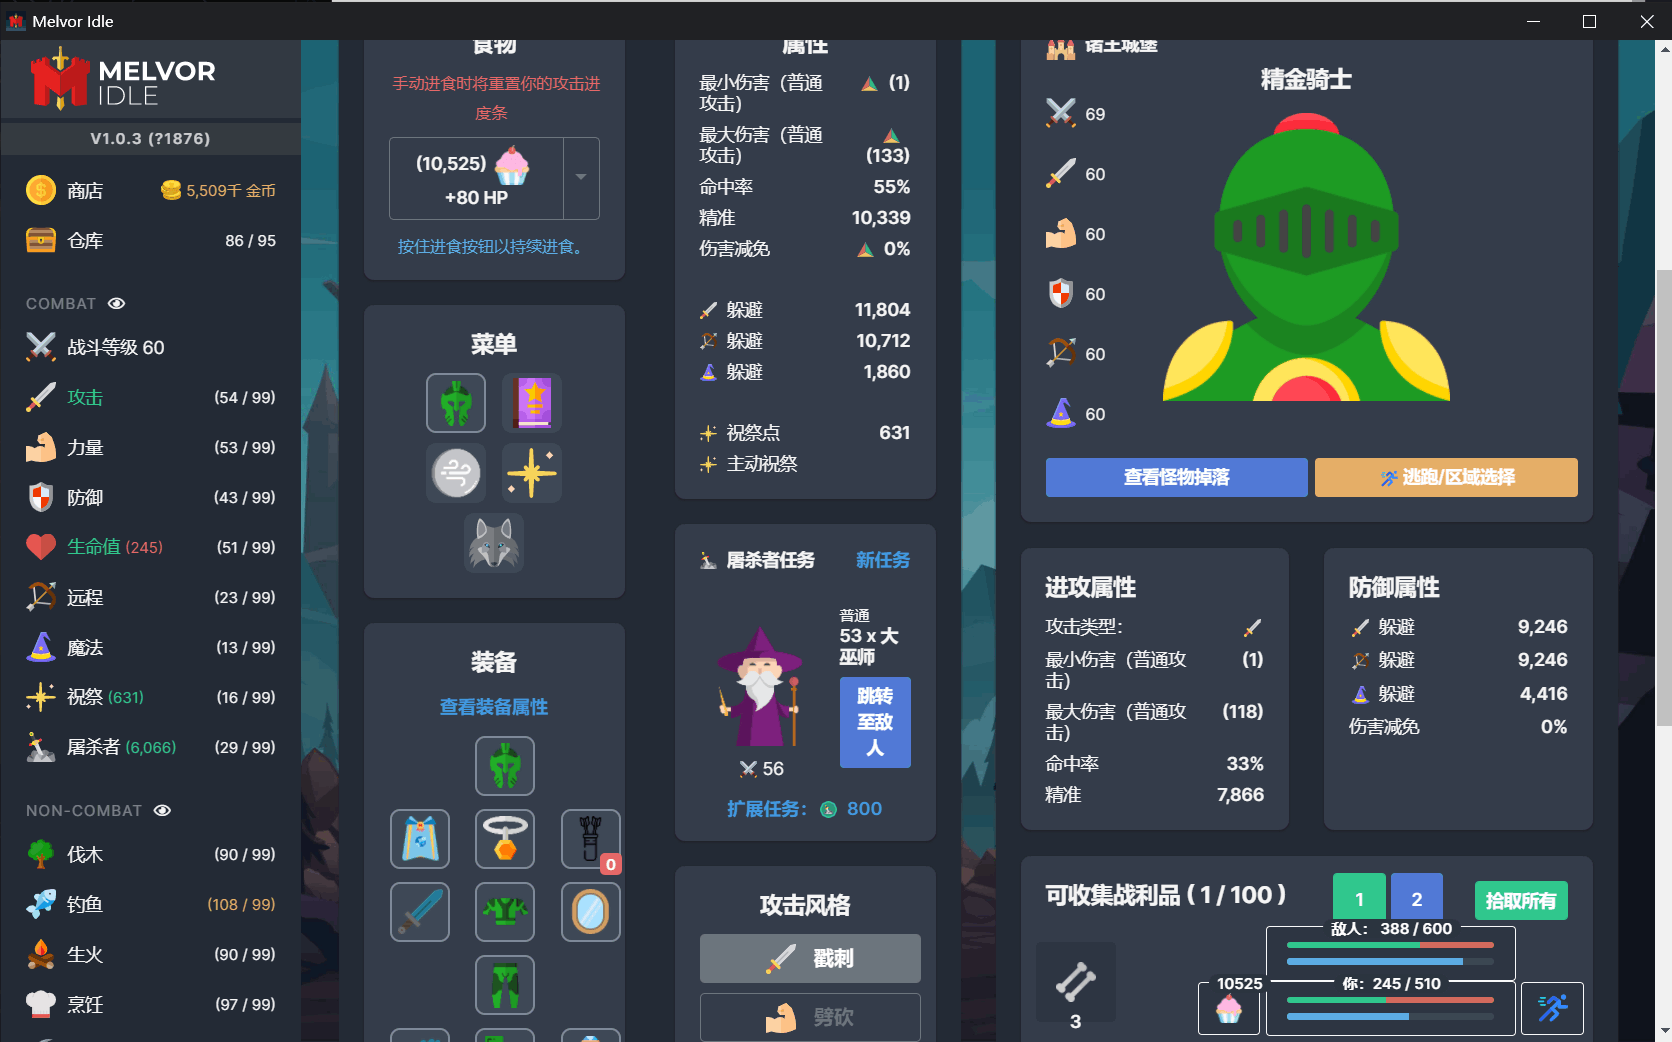
Melvor 是一款拥有丰富内容,而且糅合了熟悉的氛围以及让人耳目一新的游戏体验的放置类/增量游戏。
在游戏前期,刷怪时角色不能自动吃食物回血(后期有钱了可以在商店买自动进食),需要手动点击食物按钮。同时,战利品在游戏前期不能堆放,仅有100格空间需要经常点击按钮来收取。
本篇文章主要提供一个通过 Python 根据血条来自动吃食物回血和定时收取物资的游戏脚本的思路。该脚本通过截图来判断血条,在设定的血条百分比用脚本模拟鼠标点击进食按钮,并定时点击回收按钮。
主要技术点详解
游戏血条截图 - 本文关键
因为 Melvor Idle 采用硬件渲染,图像无法直接被诸如 ImageGrab,PyQt,pyautogui 等库获取,因此使用windows API进行截图。以下为案例:
import win32gui
import win32ui
from ctypes import windll
from PIL import Image


def photo_capture():

    hwnd = win32gui.FindWindow(None, 'Melvor Idle')  # 获取窗口的句柄
    # hwnd = 265204  # 或设置窗口句柄

    # 如果使用高 DPI 显示器(或 > 100% 缩放尺寸),添加下面一行,否则注释掉
    windll.user32.SetProcessDPIAware()

    # Change the line below depending on whether you want the whole window
    # or just the client area.
    # 根据您是想要整个窗口还是只需要 client area 来更改下面的行。
    left, top, right, bot = win32gui.GetClientRect(hwnd)
    # left, top, right, bot = win32gui.GetWindowRect(hwnd)
    w = right - left
    h = bot - top

    hwndDC = win32gui.GetWindowDC(hwnd)  # 根据窗口句柄获取窗口的设备上下文DC(Divice Context)
    mfcDC = win32ui.CreateDCFromHandle(hwndDC)  # 根据窗口的DC获取mfcDC
    saveDC = mfcDC.CreateCompatibleDC()  # mfcDC创建可兼容的DC

    saveBitMap = win32ui.CreateBitmap()  # 创建bitmap准备保存图片
    saveBitMap.CreateCompatibleBitmap(mfcDC, w, h)  # 为bitmap开辟空间

    saveDC.SelectObject(saveBitMap)  # 高度saveDC,将截图保存到saveBitmap中

    # 选择合适的 window number,如0,1,2,3,直到截图从黑色变为正常画面
    result = windll.user32.PrintWindow(hwnd, saveDC.GetSafeHdc(), 3)

    bmpinfo = saveBitMap.GetInfo()
    bmpstr = saveBitMap.GetBitmapBits(True)

    im = Image.frombuffer(
        'RGB',
        (bmpinfo['bmWidth'], bmpinfo['bmHeight']),
        bmpstr, 'raw', 'BGRX', 0, 1)

    win32gui.DeleteObject(saveBitMap.GetHandle())
    saveDC.DeleteDC()
    mfcDC.DeleteDC()
    win32gui.ReleaseDC(hwnd, hwndDC)

    if result == 1:
        # PrintWindow Succeeded
        im.save("test.png")  # 调试时可打开,不保存图片可节省大量时间(约0.2s)
        return im  # 返回图片
    else:
        print("fail")


photo_capture()
你需要:
- 安装缺少的库。
- 查找目标软件的窗口的名称或句柄(hwnd)。
- 找到合适的 window number(在 PrintWindow() ),详见注释。
- 调试完成后注释掉 im.save("test.png") 优化运行时间。
附 - 获取并打印窗口句柄
import win32gui

hwnd_title = dict()


def get_all_hwnd(hwnd, mouse):
    if win32gui.IsWindow(hwnd) and win32gui.IsWindowEnabled(hwnd) and win32gui.IsWindowVisible(hwnd):
        hwnd_title.update({hwnd: win32gui.GetWindowText(hwnd)})


win32gui.EnumWindows(get_all_hwnd, 0)
for h, t in hwnd_title.items():
    if t != "":
        print(h, t)
篇幅原因,更详细的步骤可以参见这篇文章
模拟鼠标后台点击
这里不使用 pymouse 的原因是直接调用 windows API 速度更快且不影响前台使用。但需要注意,这样的点击方式不会阻止黑屏,挂机记得调到屏幕常亮不然黑屏程序就截不了图了。
hwnd 是窗口句柄。cx,cy 是需要点击的坐标。
def doClick(hwnd, cx, cy):
    long_position = win32api.MAKELONG(cx, cy)  # 模拟鼠标指针 传送到指定坐标
    win32api.SendMessage(hwnd, win32con.WM_LBUTTONDOWN, win32con.MK_LBUTTON, long_position)  # 模拟鼠标按下
    win32api.SendMessage(hwnd, win32con.WM_LBUTTONUP, win32con.MK_LBUTTON, long_position)  # 模拟鼠标弹起
计算判断区平均颜色RGB
通过计算判断区截图的平均RGB来判断血条的颜色。
# 计算判断区平均颜色RGB
def average_RGB(img):  # 传入图片
    rgb_data = list(img.getdata())
    r_data = int(np.average(list(i[0] for i in rgb_data)))
    g_data = int(np.average(list(i[1] for i in rgb_data)))
    b_data = int(np.average(list(i[2] for i in rgb_data)))
    return {"r_data": r_data, "g_data": g_data, "b_data": b_data}
完整代码
import win32gui
import win32ui
from ctypes import windll
from PIL import Image
import time
import numpy as np
import win32api
import win32con


set_blood_percent = 50  # 设置血量百分比
set_blood_back_percent = 95  # 设置血量恢复百分比
set_pick_interval = 60  # 拾取时间间隔(s)

t_count = 0


def get_window_info():
    hwnd = win32gui.FindWindow(None, 'Melvor Idle')  # 获取窗口的句柄
    # hwnd = 67674  # 或设置窗口句柄

    # 如果使用高 DPI 显示器(或 > 100% 缩放尺寸),添加下面一行,否则注释掉
    windll.user32.SetProcessDPIAware()

    # Change the line below depending on whether you want the whole window
    # or just the client area.
    # 根据您是想要整个窗口还是只需要 client area 来更改下面的行。
    left, top, right, bot = win32gui.GetClientRect(hwnd)
    # left, top, right, bot = win32gui.GetWindowRect(hwnd)
    w = right - left
    h = bot - top
    return hwnd, w, h


def photo_capture():
    hwnd, w, h = get_window_info()

    hwndDC = win32gui.GetWindowDC(hwnd)  # 根据窗口句柄获取窗口的设备上下文DC(Divice Context)
    mfcDC = win32ui.CreateDCFromHandle(hwndDC)  # 根据窗口的DC获取mfcDC
    saveDC = mfcDC.CreateCompatibleDC()  # mfcDC创建可兼容的DC

    saveBitMap = win32ui.CreateBitmap()  # 创建bitmap准备保存图片
    saveBitMap.CreateCompatibleBitmap(mfcDC, w, h)  # 为bitmap开辟空间
    saveDC.SelectObject(saveBitMap)  # 高度saveDC,将截图保存到saveBitmap中

    # 选择合适的 window number,如0,1,2,3,直到截图从黑色变为正常画面
    result = windll.user32.PrintWindow(hwnd, saveDC.GetSafeHdc(), 3)

    bmpinfo = saveBitMap.GetInfo()
    bmpstr = saveBitMap.GetBitmapBits(True)

    im = Image.frombuffer(
        'RGB',
        (bmpinfo['bmWidth'], bmpinfo['bmHeight']),
        bmpstr, 'raw', 'BGRX', 0, 1)

    win32gui.DeleteObject(saveBitMap.GetHandle())
    saveDC.DeleteDC()
    mfcDC.DeleteDC()
    win32gui.ReleaseDC(hwnd, hwndDC)

    if result == 1:
        # PrintWindow Succeeded
        # im.save("test.png")  # 调试时可打开,不保存图片可节省大量时间(约0.2s)
        return im  # 返回图片
    else:
        print("fail")


# 鼠标后台点击
def doClick(hwnd, cx, cy):
    long_position = win32api.MAKELONG(cx, cy)  # 模拟鼠标指针 传送到指定坐标
    win32api.SendMessage(hwnd, win32con.WM_LBUTTONDOWN, win32con.MK_LBUTTON, long_position)  # 模拟鼠标按下
    win32api.SendMessage(hwnd, win32con.WM_LBUTTONUP, win32con.MK_LBUTTON, long_position)  # 模拟鼠标弹起


# 计算判断区平均颜色RGB
def average_RGB(img):  # 传入图片
    rgb_data = list(img.getdata())
    r_data = int(np.average(list(i[0] for i in rgb_data)))
    g_data = int(np.average(list(i[1] for i in rgb_data)))
    b_data = int(np.average(list(i[2] for i in rgb_data)))
    return {"r_data": r_data, "g_data": g_data, "b_data": b_data}


# 回复至设置血量
def eating(set_heal_percent=90):
    while True:
        hwnd, w, h = get_window_info()
        doClick(hwnd, w - 444, h - 37)
        # 截取桌面右下角战斗界面图片
        img2 = photo_capture()
        w, h = img2.size
        # 计算判定选区初始坐标
        w1 = w - 386
        h1 = h - 45
        w2 = w1 + 4
        h2 = h1 + 6
        # 计算血条百分比调整判断区
        heal_adjusted_pix = 200 * set_heal_percent / 100
        heal_adjusted_pix = int(heal_adjusted_pix)
        # 二次截图
        box3m = (w1 + heal_adjusted_pix, h1, w2 + heal_adjusted_pix, h2)  # 根据百分比调整判断区
        region3 = img2.crop(box3m)
        if average_RGB(region3).get("r_data") > average_RGB(region3).get("g_data"):
            time.sleep(0.05)
        else:
            break


# 完整判定循环
def auto_eat(set_percent=80):
    # 截取桌面右下角战斗界面图片
    img = photo_capture()
    w, h = img.size
    # 计算判定选区初始坐标
    w1 = w - 386
    h1 = h - 45
    w2 = w1 + 4
    h2 = h1 + 6
    # 计算血条百分比调整判断区
    adjusted_pix = 200 * set_percent / 100
    adjusted_pix = int(adjusted_pix)
    # 二次截图
    box2m = (w1 + adjusted_pix, h1, w2 + adjusted_pix, h2)  # 根据百分比调整判断区
    region = img.crop(box2m)
    # region.save('crop.jpg')  # 判断区图片保存

    # 判断红绿,模拟鼠标进食
    local_time = time.asctime(time.localtime(time.time()))
    if average_RGB(region).get("r_data") > average_RGB(region).get("g_data"):
        print("!!! red !!!----- ", local_time)
        eating(set_blood_back_percent)
    else:
        print("[ green ] ----- ", local_time)


def auto_pick():
    img = photo_capture()
    w, h = img.size
    box = (w - 193, h - 151, w - 163, h - 121)
    pick_img = img.crop(box)
    # pick_img.save('crop.jpg')  # 判断区图片保存
    r_data = average_RGB(pick_img).get("r_data")
    g_data = average_RGB(pick_img).get("g_data")
    b_data = average_RGB(pick_img).get("b_data")
    # print(r_data, g_data, b_data)
    j1 = (110 < r_data) and (r_data < 130)
    j2 = (185 < g_data) and (g_data < 225)
    j3 = (160 < b_data) and (b_data < 185)

    if j1 and j2 and j3:
        # 拾取
        hwnd, w, h = get_window_info()
        doClick(hwnd, w - 178, h - 136)
        print("pick")
        return 1
    else:
        # 警报
        print("\rWarning: Cannot Pick!!!!!!!!!!!!!!!!!!!!!!", r_data, g_data, b_data)
        return 0


while True:
    # start = time.time()
    auto_eat(set_blood_percent)
    # 自动拾取
    if t_count >= set_pick_interval * 2:
        rt = auto_pick()
        if rt:
            t_count = 0
        else:
            t_count -= 6
    t_count += 1
    # end = time.time()
    # print("{:.0f}".format((end - start)*1000)+"ms")
    time.sleep(0.25)
主要思路
目标
- 血量低至一定百分比时点击食物回血至目标血量。
- 定时收取战利品避免溢出。
逻辑
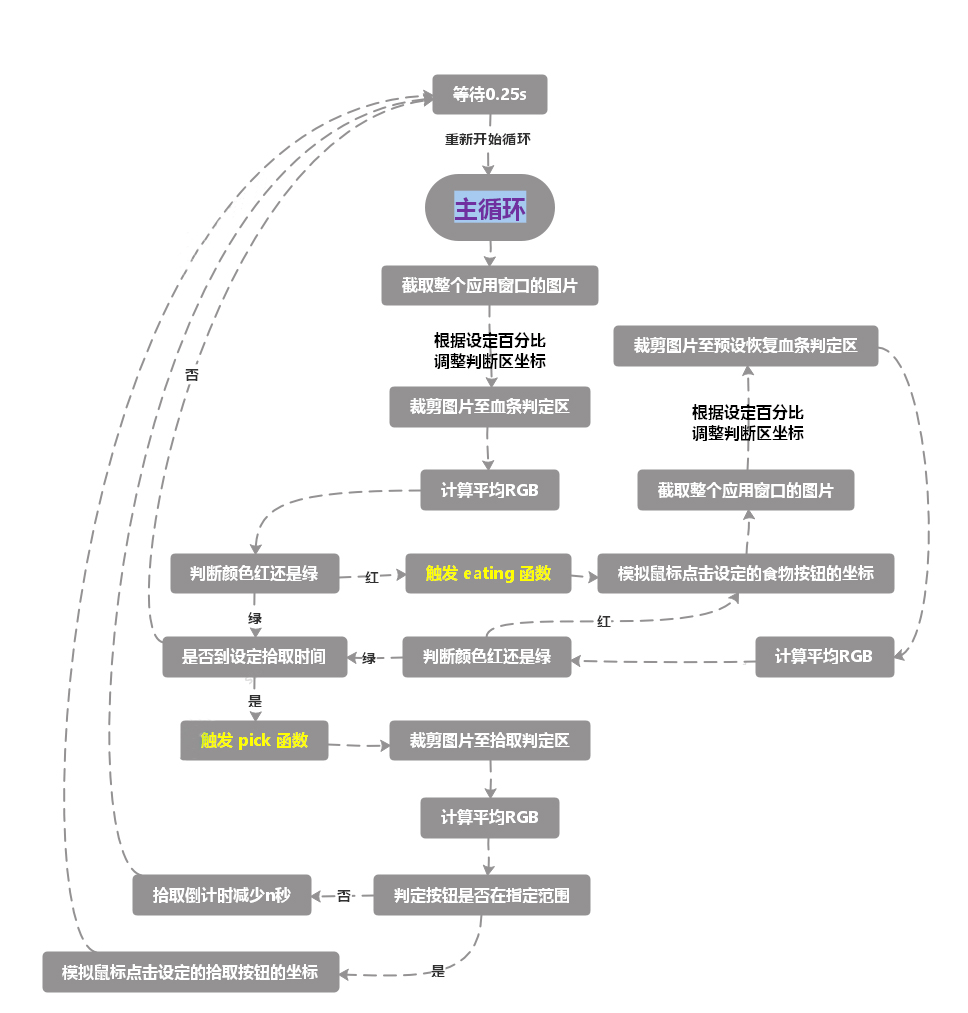
整个程序主要由两个函数:eating 和 pick 来完成主要功能。由 photo_capture(),average_RGB() 和 doClick() 来完成截图,判断颜色和点击功能。
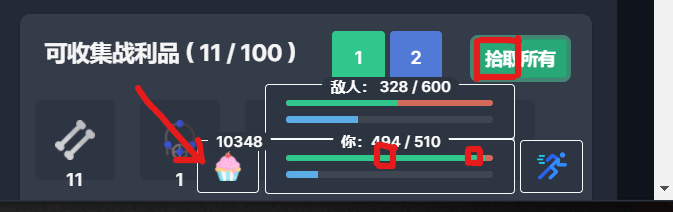
如图,下方左侧红框为血量判定区(假设设置为50%),如果变红说明血量低于50%,开始点击箭头所指的食物回血,直到下方右侧的红框(设定恢复值)变绿。
如果检测到拾取判定区(上放大红框),便点击拾取按钮,否则等待若干秒。
这就是全部逻辑。如有需要,可以加一个GUI,方便控制。
引用
获取并打印窗口句柄
凌的博客 - http://www.jiuaitu.com/python/398.html
Windows API 截图
Stackoverflow - https://stackoverflow.com/questions/19695214/screenshot-of-inactive-window-printwindow-win32gui/24352388#24352388


![彩虹六号围攻 BattlEye Launcher [INFO] Blocked loading of file 报错解决 R6s](https://res.cloudinary.com/ryanz-net/image/upload/c_thumb,g_center,h_144,q_auto:eco,r_0,w_314/v1627193941/ryanblog/Screenshot_2_xa6nbm.png)